Knowledge Base Archives: Series 3

Series 3 Service Instructions

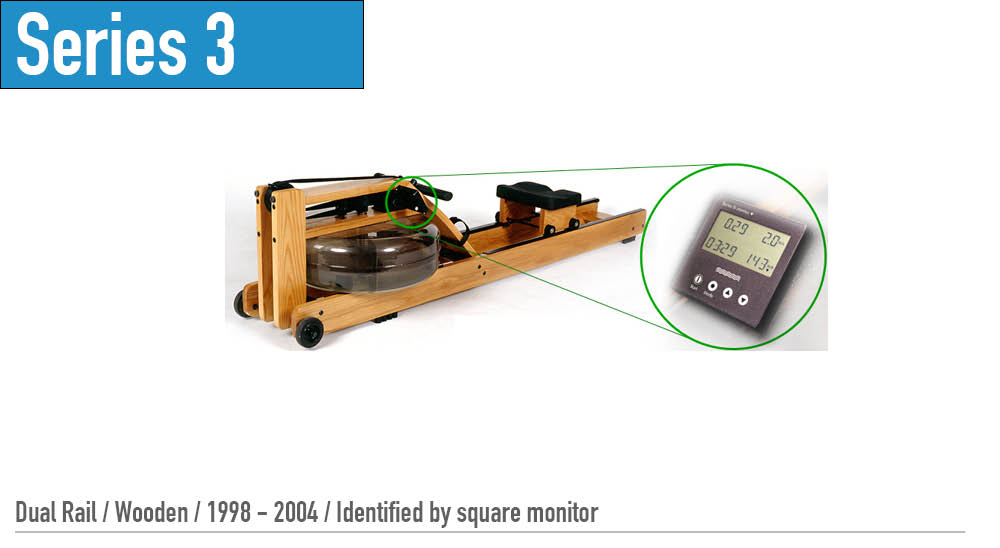
Series 3: Recoil Belt Buckle Replacement

Step 1- Pass the Recoil Belt through the bungee buckle with the belt facing the serrations on the buckle as shown.   Step 2- Pass the Recoil Belt through the D-ring and back through the bungee buckle as shown. The Recoil Belt should follow itself back through the buckle. It is advised that the loose …

Series 3 Service Instructions

Series 3: Recoil Belt Replacement

For Video Instructions, click here: Replacing the Recoil Belt Step 1- Remove the handle from the handle rests and place the handle in the full forward position Step 2- Stand the WaterRower upright and disconnect the bungee from the recoil belt as shown Step 3- Lay the machine down and remove the recoil strap from …

Series 3 Service Instructions

Series 3: Oilite Bearing Replacement

Step 1- Remove the Handle from the handle rests and place the handle in the full forward position. Step 2- Stand the WaterRower upright and disconnect the bungee from the Recoil Belt as shown.   Step 3- Lay the WaterRower down and slowly pull the handle so that the Drive Strap unwinds from the clutch …

Series 3 Service Instructions

Series 3: Level Gauge Location

The Level Gauge sticker on all Series 4 (S4) model WaterRower units, is located on the side of the tank under the tank stopper.   The Level Gauge sticker on the A1 and Indo-Row units is located on the bottom of the tank. On the A1 and GX WaterRower units, this sticker also has the …

Series 3 Service Instructions

Series 3: Handle Replacement (metal clutch)

For Video Instructions, click here: Replacing the Handle Assembly (Metal/Velcro attachment) Step 1- Remove the Handle from the handle rests and place the handle in the full forward position. Step 2- Stand the WaterRower upright and disconnect the bungee from the recoil belt as shown. Step 3- Lay the WaterRower down and slowly pull the …

Series 3 Service Instructions

Series 3: Handle Replacement (plastic clutch)

For Video Instructions, click here: Replacing the Handle Assembly (Plastic – Bolt On)   Step 1- Remove the handle from the handle rests and place it in the full forward position.   Step 2- Stand the WaterRower upright and unclip the bungee from the recoil belt.   Step 3- Lay the WaterRower down and slowly …

Series 3 Service Instructions

Series 3: Full Tank Assembly Replacement

Handle Removal Step 1.  Remove the Handle from the handle rests and place the handle in the full forward position Step 2.  Stand the WaterRower upright and disconnect the bungee from the recoil belt as shown Step 3.  Lay the WaterRower down and slowly pull the handle so that the drive strap unwinds from the …

Series 3 Service Instructions

Series 3: Forward Riser Replacement

For Video Instructions, please see the following link: Replacing the Forward Riser Assembly Step 1- Remove handle assembly (see handle removal replacement instructions) Step 2- Remove Recoil Belt (see recoil belt replacement instructions) Step 3- Remove Tie Rod bolts as shown. Step 4- Remove the fasteners connecting the forward riser bottom bracket to the side …

Series 3 Service Instructions

Series 3: Metal Clutch Replacement

For Video Instructions, click here: Replacing the Clutch (Plastic) Step 1- Remove the handle from the handle rests and place the handle in the full forward position as shown.   Step 2- Stand the WaterRower upright and disconnect the bungee as shown. Step 3- Lay the WaterRower down and slowly pull the handle so that …

Monitor Series 3 Service Instructions

Series 3: Monitor Troubleshooting

Battery Replacement Your Series 3 WaterRower requires 4 (AA) batteries for monitor function. If your monitor does not power on, these batteries likely need replacing. The battery pack is located beneath the foot board and between the 2 black key brackets (pictured below). The right key bracket will have the monitor attached to it. Keep …