If your tank has sprung a leak, the best way to go about repairing it is with our Tank Glue Kit.
We have full written instructions as well as a service video available for you below. Please read all instructions carefully and view the service video before attempting this repair.
Be sure to handle the tank with care – cracking either the top or bottom half would cause irreparable damage, requiring replacement.
If your tank has any cracks, you will need to order a replacement tank assembly.
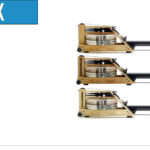
You will need to identify the type of clutch your rower has when ordering.
Click here for help identifying clutch type.
Click here to view the tank repair video.
Please note:
- We highly recommend using a caulk gun to do this repair.
- To prevent premature glue curing, please perform this repair in temperatures between 50º-70º F (10º-21º C).
- The glue has a shelf life and we highly recommend using the glue within 3 months of purchase.
Step 1 – Remove the handle from the handle rests and place the handle in the full forward position. Empty the tank of water and leave the tank stopper out.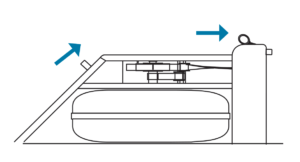
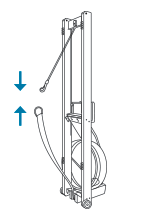
Step 2 – Stand the WaterRower upright and disconnect the bungee.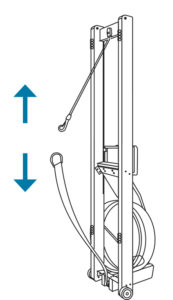
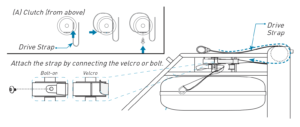
Step 3 – Completely remove the handle/drive strap from the tank assembly by pulling on the handle. Some WaterRower models have the drive strap bolted onto the clutch, on others it is attached with Velcro (which may also have a bolt securing the strap). Leave the lower recoil belt in place.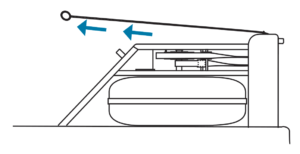
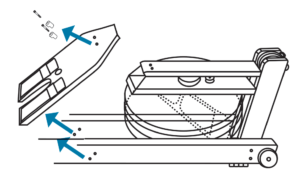
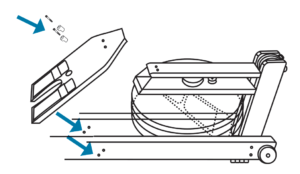
Step 4 – Remove the footboard. To do this, remove the two handle rest bolts at the top. Also remove the four JCN nuts and JCB bolts that connect the footboard to the rails.
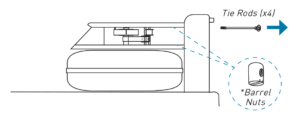
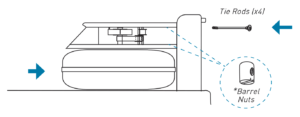
Step 5 – Remove the 4 tie rod bolts on the front of the WaterRower that secure the top and bottom decks to the forward riser. Be careful not to lose the barrel nuts that will drop out from the underside of the top deck.
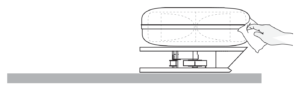
Step 6 – Slide the tank assembly (with clutch, pulleys, and the top and bottom decks attached) towards the seat to check that it is free of the rest of the unit. Lift the tank off of the rails, turn the tank over and rest it upside down (on the top deck) on a clean, dry surface that is at a comfortable height. Be sure the surface is free of any debris that could damage the top deck or get in the way of being able to work freely.
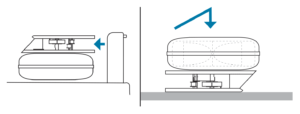
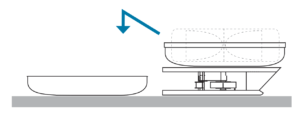
Step 7 – Separate the two halves of the tank, being careful not to damage either half. Gently push in on inner “male” half to separate. Work your way around and test the tank carefully to find any “stuck” sections. All of the old adhesive must be removed. Use a razor blade to carefully cut and peel away any sticking, dried adhesive (the dried adhesive may look like a gasket).
If needed, a hair dryer may be used to help soften the old adhesive, making it easier to cut into and remove. Once you’ve broken the seal with the cuts, the bottom half of the tank should lift off with minimum force. Be careful at this point, as the tank half may flex and could easily crack – remove the bottom half evenly/squarely. Leave the paddle in place.
WaterRower customer, Chris Wood, offers this advice to separate the tank halves:
“I removed the old seal with 3 scalpel cuts. The first 2 cuts remove the bead of sealant along the top of the joint and allow you easy-access for the 3rd cut which is the narrow space where the two tank halves overlap. Having sliced through both surfaces where the sealant bead meets the tank, it should peel off like string, leaving clear access to the sealant between the overlapping tank halves.
If you’re lucky this might just lift out (some of mine had work-hardened), otherwise your 3rd cut is made by sliding the scalpel into the gap and cutting around the circumference of the tank. Given the depth of the seal, I had to do this about 2 times, cutting through a few millimeters at a time. I found making this cut put some flex into the scalpel blade and I had one snap; it would be wise to wear protective goggles.”
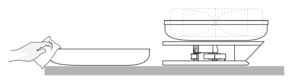
Step 8 – Clean both halves of the tank. Dry any residual water and completely remove any old adhesive. Wipe all surfaces with denatured alcohol and allow 2 minutes to dry.
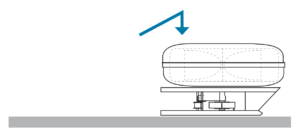
 Step 9 – Carefully fit the two halves of the tank back together. Be sure they are fully engaged.
Before you begin to use the adhesive, make sure you have everything ready and you are able to do the gluing process without disturbance; the reason being the glue sets very quickly.
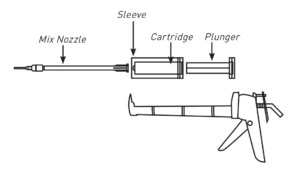
Step 10 – Assemble the applicator tip. Screw the ½” needle onto the hexagonal end of the white luer lock and tighten. Insert the narrow end of the mixing tube into the open end of the luer lock. You may need to use some pressure to get the threading to start. Tighten the needle, luer lock and mixing tube together.

Step 11 – Follow the instructions printed on the back of the caulk gun adapter on how to assemble and insert the glue kit cartridge into the caulk gun. Note:
1. Insert 50ml Cartridge, nose first, through the oval opening (this is the end with the smaller opening) of the sleeve until the cartridge flange fits snugly against the end of the sleeve.
2. Place the plunger in the back of the cartridge.
3. Connect the mix nozzle to the cartridge by removing the cap from the cartridge and breaking off the top section to allow the nozzle to fit into the cartridge.
4. Place the conversion kit, with mixer and cartridge, in a caulking gun as shown below.
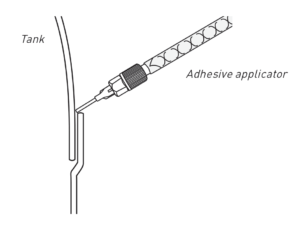
Step 12 – Rest the tip of the applicator needle in the corner formed at the edge of the seam of the tank.
Apply the glue evenly and smoothly into the seam. You may find it helpful to have someone work with you to gently rotate the tank for you as you glue along the seam of the tank. It may take several rotations of the tank until all the glue is used up.
Make sure you work quickly and continually. In doing so, the glue will be very liquid as it flows from the applicator tip and will be drawn down into the gap between the two halves of the tank. If you pause, the glue will become viscous as it exits the applicator tip and will not be drawn into the gap.
Try working at a rate of 1” per second.
 Step 13 – Wipe any drips away with a clean cloth.
Step 14 – Allow four (4) hours for adhesive to set.
Step 15 – Replace the tank assembly on the rails. Replace the four (4) tie rod bolts and barrel nuts on the front of the WaterRower that secure the top and bottom decks to the forward riser.
Step 16 – Replace the footboard. To do this, replace the two handle rest bolts at the top. Also replace the four JCN nuts and JCB bolts that connect the footboard to the rails.
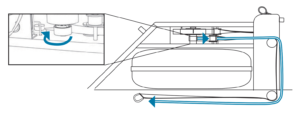
Step 17 – Replace the handle. Ensure the handle/drive strap assembly is facing the correct way and the drive strap is straight (with no twists). Pass the velcro/bolt end over the large pulley in the forward riser.
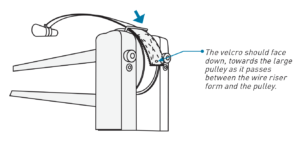 Step 18 – Pass the handle/drive strap around the large pulley and underneath the top deck back towards the clutch housing. The end of the drive strap passes inside (towards the center of the machine) the drive strap guide pulley (the upper of the two guide pulleys).
For velcro attachment on metal clutch, take the end of the drive strap and place the edge against the side of the clutch nearest the monitor. For plastic clutch, see image (A) below:
Step 19 – Once the handle/drive strap is attached, gently pull on the recoil belt. This action re-winds the drive strap around the clutch.
By continuing to pull the recoil belt, wind the drive strap onto the clutch so the handle reaches the full forward position.
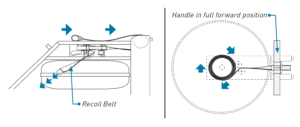
Step 20 – With the recoil belt is at its full length and wrapped 1½* turns around the recoil bushing, pass the recoil belt inside the recoil belt guide pulley and over the two pulleys in the forward riser. *If the recoil belt is wrapped more or less than 1½ turns, please adjust.
Step 21 – Stand the WaterRower upright and connect the recoil belt to the bungee. Lay the WaterRower down – it is ready to use.